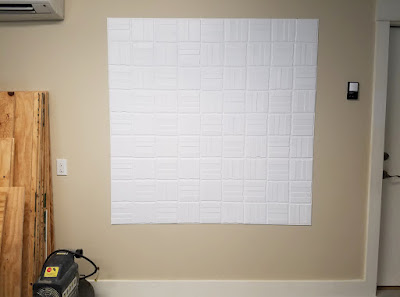
Dimensional wall panels makeover.
I had recently been mulling over solutions to better photograph and video
my pieces like this botanical mosaic instead of on my plain painted wall.
In my home studio, I already have a good sized wall space with two windows
opposite for great natural light but hanging different sized art pieces to
video and photograph has left a messy wall with lots of different nails,
hooks and smudges... not cool, I needed a better solution.
See what I mean?
I can edit them out in photos but it really doesn't look
pretty or professional in my Youtube videos.
I decided to try these textured, thin, dimensional panels to make-over the area
of the wall for photographing. These are widely available online and I chose
a textured basketweave design call "Caro". This design came with 10 panels
per box. The panels are approximately 20" x 20" and made of MDF wood fiber.
They are very thin and lightweight.
As shown in above pic, they came in the natural MDF color so I
started by priming with Rustoleum spray primer in white.
I decided to go with neutral white in semi gloss and rolled on
a couple of coats after the primer.
To install, we drew out a level line vertically and horizontally and marked lightly
with a pencil. I'm only using 9 of the 10 panels to create a
background of a large square on my wall, 3 panels across and 3 panels tall.
Of course you can create an entire wall or just a focal area with these panels
which would look amazing, but for my purposes, I'm going with a
large square.
To apply to the wall, you apply construction adhesive to the backs and
press into place. Since you started with a level line, it all goes pretty quickly
as you butt them up next to each other. We used Liquid Nails to apply ours.
If I were applying a focal area like this in the home, I would
probably frame the entire piece in wood for a finished look but
in this case, the edges won't be seen.
For my wall, I intend on placing the majority of my nails in the
middle seam to camouflage holes. I spray painted a few nails white so
that if any happened to be captured in a video, they won't be noticeable.
The textured design looks great.
I tested it out by hanging my latest crab mosaic.
I'm so happy with the look. It's clean, yet interesting and unobtrusive
for photographing my mosaics and the best part...no more
nail holes and smudges.
Visit my new online store featuring mosaic art and coastal style ornaments.
Cheers!
~Lucy


beautiful home decor ideas i love it its really cool
ReplyDeleteThank you Naveen
DeleteThat's an amazing transformation for photographing your mosaics! Beautiful work all around!!!
ReplyDelete