Showing posts with label Projects Around the Home. Show all posts

May 2, 2017

Art studio dimensional wall panels for photography DIY makeover

using wall panels for art wall
Dimensional wall panels makeover.

art studio wall makeover
I had recently been mulling over solutions to better photograph and video
my pieces like this botanical mosaic instead of on my plain painted wall.

In my home studio, I already have a good sized wall space with two windows
opposite for great natural light but hanging different sized art pieces to 
video and photograph has left a messy wall with lots of different nails, 
hooks and smudges... not cool, I needed a better solution.

how to cover nail holes in wall diy
See what I mean?
I can edit them out in photos but it really doesn't look 
pretty or professional in my Youtube videos.

textured mdf wall panels box
I decided to try these textured, thin, dimensional panels to make-over the area
of the wall for photographing. These are widely available online and I chose 
a textured basketweave design call "Caro". This design came with 10 panels 
per box. The panels are approximately 20" x 20" and made of MDF wood fiber.

mdf thin textured wall panels
They are very thin and lightweight.

spray primer for textured wall panels
As shown in above pic, they came in the natural MDF color so I 
started by priming with Rustoleum spray primer in white.

painting textured wall panels before installation
I decided to go with neutral white in semi gloss and rolled on
a couple of coats after the primer.

diy installing textured wall panels csi
To install, we drew out a level line vertically and horizontally and marked lightly
with a pencil. I'm only using 9 of the 10 panels to create a 
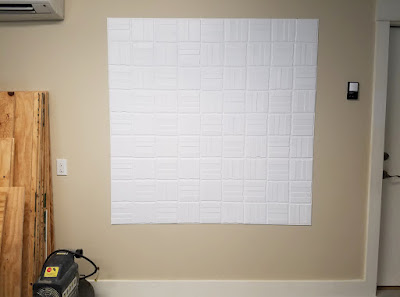
background of a large square on my wall, 3 panels across and 3 panels tall.

Of course you can create an entire wall or just a focal area with these panels
which would look amazing, but for my purposes, I'm going with a 
large square.

textured mdf wall panels
To apply to the wall, you apply construction adhesive to the backs and 
press into place. Since you started with a level line, it all goes pretty quickly
as you butt them up next to each other. We used Liquid Nails to apply ours.

If I were applying a focal area like this in the home, I would
probably frame the entire piece in wood for a finished look but
in this case, the edges won't be seen.

spray painted nails to disguise them
For my wall, I intend on placing the majority of my nails in the 
middle seam to camouflage holes. I spray painted a few nails white so 
that if any happened to be captured in a video, they won't be noticeable.

csi wall panels textured wall panels
The textured design looks great.

crab mosaic on textured wall
I tested it out by hanging my latest crab mosaic.

csi wall panels on gallery wall
I'm so happy with the look. It's clean, yet interesting and unobtrusive
for photographing my mosaics and the best part...no more 
nail holes and smudges.

Visit my new online store featuring mosaic art and coastal style ornaments. 
Find me on FacebookPinterest, InstagramYoutube
Cheers!
~Lucy

October 16, 2016

How to paint decorative ceramic objects, DIY makeover with spray paint tutorial

painting ceramic

Did you know you can paint decorative ceramic items? Well, you can!

I'm one of those people that will paint pretty much anything.
to name a few, so I didn't bat an eyelash over the thought of painting over 
a pair of of ceramic vases I had.

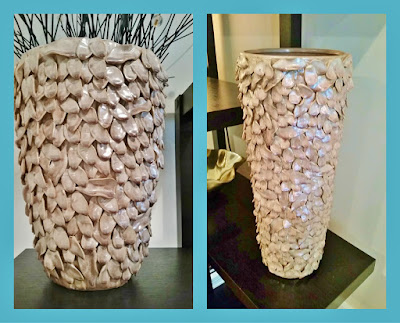
before and after diy painting ceramic vases
This is what I was starting with.
I love these handmade vases that I bought years ago at a fancy shop.
They are large and heavy with hand applied ceramic petal pieces.

Although beautiful, this beige color just wasn't jiving in my new home 
so I decided to change them up rather than get rid of them.

how to paint ceramic pieces with spray paint
I started by spraying them with light blue satin spray paint that had
built in primer. This part can be a little scary because they 
look horrible at this point, but keep going!

spray painted decor idea
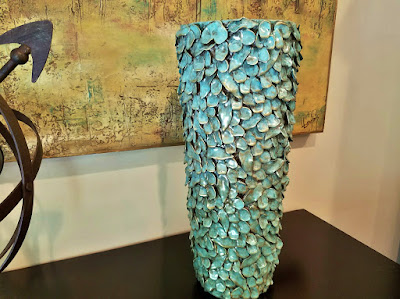
Next up, I dry brushed a warmer aqua color on top.
The before is on the left, after the aqua is on the right.

***Important...You must spray with a clear satin sealer at 
this point and let dry before going to the next step.
If you haven't sealed and start applying watery paint in the
next step, you will remove your previous paint layer.
Make sure to use satin finish. If it is too glossy, the brown
wash in the next step will not adhere at all.

add brown paint wash to painted finish
After they were sealed and dry, I brushed on watered down brown
acrylic paint over the petals. I turned them upside down so the
paint could seep into all the nooks and crannies.

ceramic vase makeover
While the paint is still wet, quickly...and patiently in this case with
all the petals!...wipe away the excess brown paint with soft rags.

"Before" the brown wash is shown on the left and "after" on the right.

diy how to paint ceramic decor
The brown adds a lovely toned down look with lots of color 
variation.

Rustoleum clear laquer spray sealer
Seal with several coats of Rustoleum clear laquer, it gives a great high gloss finish.

I almost exclusively use Rustoleum spray paints (unless I can't find
a certain color) because they are just wonderful... and they didn't pay me to say that.

how to paint decorative ceramic pieces
I didn't show this step but before I sealed with the laquer, I 
dry brushed a little gold metallic paint on the edges of the petals.
Metallics are so hard for me to capture in a photo but you can see 
glimpses of it in this photo.

Dazzling metallics in glorious gold is my go-to gold paint.

ceramic vase makeover diy painting ceramic
The "new" vases fit much better in our color scheme.

decorative ceramic orb makeover
While I was at it I had a large cut work ceramic orb in bright 
white that didn't really go with our decor either, so I applied 
the same technique.

diy ceramic orb makeover
I used the same color paints as the vases. After completing all the 
steps above, I used Rustoleum Bright Coat in gold and sprayed it very heavily at the
top of the ball until it puddled and let it drip down randomly around the ball.
I coated with with the high glass laquer for the final coat.

It looks much more shiny and metallic than this photo shows!

Thanks for stopping by!

Visit my new online store or
Find me on Facebook, Instagram and Pinterest.
Visit my all new Youtube channel where I show short
clips of current artwork in my Etsy shop

November 19, 2015

Kitchen Pantry Makeover, Replace wire shelves with wrap around wood shelving for under $130 DIY

pantry makeover before and after, remove wire shelves
Almost five years ago, I made over my pantry
by removing the deep wire shelving and replacing with wrap
around shelving.
Today, I did it again in my new home and I love it!
It's been on my to-do list ever since we moved in.

messy wire shelves in pantry, pantry makeover
This is what I started with... ugh.

makeover your pantry
I didn't even pretend to straighten it up before taking a photo.

I'm so over this deep, constantly messy, can't find anything,
have to move five things out of the way to get one thing, pantry.

how to remove closet maid shelf anchors in wall
Just like my last pantry makeover, I started by removing the 
wire shelving, patching the holes and adding touch up paint.

I was having a bit of a difficult time getting the Closet Maid wire shelf anchors 
out of the wall but found that a tiny flat head screwdriver helped
pry the nail out just enough to be able to grab with the pliers
and remove it.

I'm not gonna lie... if you remove these types of 
anchors, you are going to be left with giant holes to patch.
It will be worth it, I promise!

shelf supports for pantry makeover
Just like last time, I bought all white pre-primed wood boards
for the shelves as well as pre primed 1 x 2's for the supports
from Home Depot and that is such a time saver.
I bought 8 ft lengths and cut to the sizes I needed at home.

I did not paint over it, just used as is.

shelf supports installed for pantry makeover
I spaced my shelves about 13" apart.
You can always adjust the spacing to fit your needs.

**This is a pantry with potentially heavy items like canned goods.
When attaching your 1 x 2's to the wall you must screw the majority
of your screws into the wall studs so your shelves will be super strong and sturdy.
It goes without saying you must also use a level as well when
installing your 1 x 2's... you don't want lopsided pantry shelving.

screw and anchor combo
I used this type of screw I found at Home Depot to 
mount the 1 x 2's. 
**You must drill pilot holes in the
 1 x 2 wood pieces before using this screw or you will split the wood.

pantry redesignI
I mounted the back wall 1 x 2 supports first. Once they were in place,
it was easy to rest the level on the edge of the back support to level the side 1 x 2's.

pantry makeover DIY installing wood shelving
Then I forgot to take more during pics, but here I'm starting to
lay the shelving boards on top of the 1 x 2 supports.

After laying the shelving boards on top of the 1 x 2's, you then need to secure
them to the 1 x 2's to keep them in place. To do that, I used regular wood screws 
along the back edge of each shelf to screw down into the 1 x 2 supports.
I placed my screws about 6-7 inches apart along the back of each shelf.

**Since you are screwing into the very back edge of the shelf and down into 
the 1 x 2, you must predrill your holes again so the wood
won't split on the edge.


kitchen pantry with wood shelving
This pantry is a little different and a little larger than my last one. 
In this pantry, the door swings open into the pantry,
in my old pantry, the door swung out into the room.

This means there is no end wall for the side pieces to butt up
against like last time which gave them extra support, instead
my shelves are open-ended...

metal mending plates for pantry shelves
To remedy my lack of an end wall for my side shelves, I used metal mending 
plates on the underside to secure the side shelves to the back shelves 
and it worked like a charm.

To reiterate and ease any fears or confusion on whether there is enough 
support for the shelves, just remember...

The deeper back shelves are fully supported on THREE sides.
 They are supported across the full length of the shelf by the back wall 1 x 2's 
as well as being supported on each end by the side wall 1 x 2's.

The side shelves are only 6" deep and are supported by the side wall 1 x 2's 
as well as being anchored to the (supported on 3 sides) back shelf
with the metal mending plates. The metal mending plates also
serve to help the corners line up perfectly.

And as mentioned. all shelves are then screwed into the 1 x 2's
that have been securely screwed into your wall studs! :)

use metal mending plates to secure wood shelving


kitchen pantry makeover with wood shelves
I used 12" deep shelves on the bottom two back shelves, 
8" deep for the remaining back wall shelves and 6" on the sides.


pantry makeover reveal
Looking in to the left...

kitchen pantry makeover with wood shelves
Looking in to the right...

kitchen pantry makeover DIY reveal
Straight ahead...
*starry eyed*

The lowdown on this makeover...

I've gotten so many emails about my previous pantry makeover
from people worried they will lose space. In my last makeover
I felt I had gained space but had not measured before and after so
 I didn't know for sure.

This time, I measured the wire shelf space before I removed them
and calculated I had 21.56 square feet of shelf space.

The after measurements with my new wrap around 
wood shelves measure 21.36 square feet.
So it's practically the same but you will feel like you have more
space simply because you can see everything.

I'll take being able to clearly see what I have in the pantry
over a negligible loss of space any day!

I spent a total of $127 for this makeover including primed wood, 
screws and mending plates, yours could be 
more or less. My pantry is 33"w x 34" deep to where
the door swings in and a 9ft ceiling.

$130 bucks for a lifetime of pantry happiness? yes please!

pantry redesign before and after
I started this project one evening by removing the wire shelving
and patching the holes so it would be ready to go the next morning.
I finished the next day so these before and after photos 
show the exact same food and items in the pantry.

Thanks for reading about my latest pantry makeover!

Would love for you to visit my new online store. You can also
or swing by my Etsy shop for reduced prices on remaining paintings
and mermaids.
Until next time!...

February 1, 2012

Painted Ceiling Medallions, Easy DIY painted bronze finish

diy painted medallions bronze finish
I work with a local interior designer occasionally for painted projects 
or makeovers she needs. On this job she needed these 3ft diameter
ceiling medallions painted in a bronze finish.
She contacted me to paint them before they were installed so
my neck was happy about that!

painted finishes diy
This was a quick project.
I started by spray painting a reddish brown base coast.
When that was dry I applied watered down
black paint and used a brush to get in all the nooks and crannies
then wiped away the excess with a soft cloth.

diy painted ceiling medallions
This is one of them after the black paint had dried

easy diy bronze medallions
When all was dry I dry brushed with a muted gold metallic paint.
In this pic, the bottom one has been brushed with metallic, 
the top one has not

ceiling medallions in bronze
They look much better than my phone pics are leading you to believe!

bronze medallion

bronze ceiling medallion diy
detail...

before and after painted ceiling medallions
Before and After
 Visit my new online store featuring mosaic art and coastal style ornaments. 
Find me on FacebookPinterest, Instagram and Youtube
Thanks for stopping by!


Total Pageviews

01 09 10 11 12
Blogging tips