Showing posts with label Faux Finishes. Show all posts

February 1, 2012

Painted Ceiling Medallions, Easy DIY painted bronze finish

diy painted medallions bronze finish
I work with a local interior designer occasionally for painted projects 
or makeovers she needs. On this job she needed these 3ft diameter
ceiling medallions painted in a bronze finish.
She contacted me to paint them before they were installed so
my neck was happy about that!

painted finishes diy
This was a quick project.
I started by spray painting a reddish brown base coast.
When that was dry I applied watered down
black paint and used a brush to get in all the nooks and crannies
then wiped away the excess with a soft cloth.

diy painted ceiling medallions
This is one of them after the black paint had dried

easy diy bronze medallions
When all was dry I dry brushed with a muted gold metallic paint.
In this pic, the bottom one has been brushed with metallic, 
the top one has not

ceiling medallions in bronze
They look much better than my phone pics are leading you to believe!

bronze medallion

bronze ceiling medallion diy
detail...

before and after painted ceiling medallions
Before and After
 Visit my new online store featuring mosaic art and coastal style ornaments. 
Find me on FacebookPinterest, Instagram and Youtube
Thanks for stopping by!


June 10, 2011

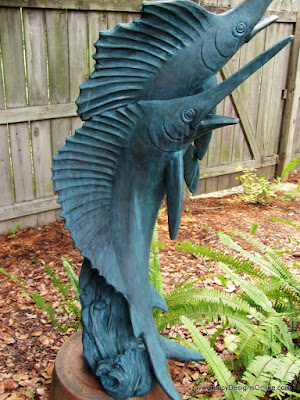
Verdigris Sailfish

Verdigris:  a green or bluish deposit especially of copper 
carbonates formed on copper, brass, or bronze surfaces. 

This is a sculpture of my sister's and the finish had worn off so she spray painted it
....blue and silver
She asked if I would give it a verdigris finish...

I started by priming with rust colored primer. 
 I almost forgot to take a pic before I went to the next step which is to spray with green...explains the rust AND green in this pic

Lightly sprayed with a dusty green...

I left some of the rust color showing when spraying. 
The rust will give the look of weathered copper underneath all of the other colors...

Then I just start layering color, using very wet paint. 
 I started with black then went to a dark green/black mixed and finally to varying shades of this turquoise color...

After applying wet paint, I dab off with soft cloth as I go. 
I think the key to any faux finish is using layers and layers of color and just playing with it as you go....

I let it drip down when applying the paint just like the finish would be if it were a copper piece getting rained on and out in the weather...


I finished with a clear satin finish spray

It's big...about 4 feet tall...


Join me on Facebook and Pinterest too!

April 9, 2011

A Free, A Fail, and A Faux, Roadside Mirror Makeover with Aged Rusty Finish and Vintage Look

aged mirror makeover diy
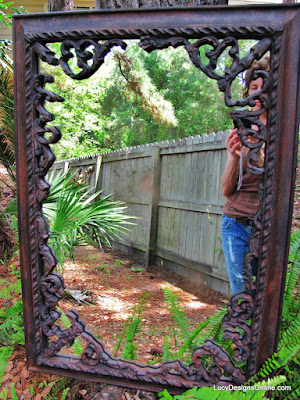
"After"

mirror frame makeover diy
This is how it started, it was on the side of the road, so I grabbed it
 Excuse Ace, he was admiring himself as cats do.


mirror makeover
I decided to paint it dark brown....

mirror makeover
Ewwww,  
It reminded me of Elvis and velvet paintings
so I decided to change it up.

aged mirror frame makeover
I used the jigsaw and cut off random pieces..., 
like they may have been broken off... then randomly sprayed
areas with a rust colored spray paint over the brown finish.

using flour for faux paint finish diy
I used the flour treatment on the frame for a super aged effect.

I sprayed oven cleaner in random areas on the back of the mirror 
to eat away the protective coating and give an aged look to the
mirror as well. 
Then I repainted the frame with layers of color.

diy faux aged mirror
Did you know that it's hard to take a picture of a mirror without yourself in it? 
Well...it is, so ignore the girl in the painted up clothes

faux aged mirror technique
You can't see very well where the mirror is "aged" from the oven cleaner, but it's there!

diy rusted wrought iron finish
Going for the rusted, pitted, wrought iron look,

faux finish aged rust
Using the flour really gives it that realistic aged, look.


diy aged pitted rust look


rust faux finish
I happen to like it now...much more interesting to me.  
What do you think, would you have left it alone?

This one of a kind mirror is sold.
Thanks for stopping by

Join me on Facebook, Instagram and Pinterest
or visit my Etsy Shop

March 14, 2011

Use Flour and Water for Weathered Concrete Faux Finish


weathered plaster pedestal with flour faux finish
Here's a little plaster table/plant stand I just finished.

plaster pedestal
It started plain like this, someone gave it to me.

I forgot to take pictures of the first couple of steps but to start,
I took watered down dark gray paint and brushed it on the whole piece.  
The plaster soaked it right up.
Then I dry brushed it with off-white paint....

faux finish using flour and water diy
Next, get a bit of flour (yes, flour) and a spray bottle of water.
You can see the "before" look of the pedestal in the background.

faux finish using flour
Sprinkle the flour on randomly. 
In some areas, I rubbed it in with my hands to spread it out.
Mist lightly with water and let dry.

how to use flour for aged concrete look
It's the same concept as using flour and water when making paper mache 
that dries hard. In the picture above, the flour is dry and I'm about to go to the next step.

Take a large, stiff paint brush, and brush the excess flour off. 
The flour that is going to stick is not going to budge and the excess brushes off.
And that's it....you've created weathered concrete.

use flour for aged effect
It may be hard to tell but it really adds some cool texture.
It looks like it has been sitting outside for a long time and has a nice weathered patina.

flour water and paint for weathered pitted look


flour and paint for aged effect
You can see where the flour is dried into some of the crevices.

use flour and paint for weathered aged look
Indoor use only, this one of a kind piece has sold.

Thanks for looking!

Join me on Facebook, Instagram and Pinterest
or stop by my Etsy shop

October 8, 2010

Metal Mini Blind Makeover From White to Bamboo Blinds DIY

mini blind makeover metal to faux bamboo
This little makeover came about when I bought my first house back in
the early 1990's. I needed a quick, inexpensive solution to cover all the windows and
ended up going with what was popular and easy at the time...white metal mini blinds.

Fast forward a few years down the road and I had replaced all the blinds
 except the one in the laundry room.  It was a special order size to begin with
and the window faced East, meaning it was very hot and bright in the 
mornings when the sun came up. I actually liked the light control
I could get with the mini blind but one day I got tired of looking at it
and decided to change it up.

I don't have a before pic but it was a basic metal white blind.

I took it outside, washed it and let it dry. 
I didn't have quite the color of spray paint on hand I wanted for the background so I ended
 layering about 3 different colors of spray paint to get a camel color...
(This was before I knew to take pics during the creation process)

 I brought them inside, hung them back up, and painted the details while they were hanging, 
much easier!

bamboo mini blinds
I have other bamboo blinds in my home so I studied them then headed back
 in the laundry room to paint.  I used several different acrylic paints in browns and 
tans to get the variation and just played with it as I went.

mini blind to bamboo blinds makeover
They ended up looking pretty close to bamboo and much better to look at 
than white mini blinds... especially while doing laundry

Thanks for checking out my mini blind makeover!

Swing by my shop to see what's new and 
Join me on Facebook, InstagramPinterest and visit my
new youtube channel to see short videos of my artwork.

Total Pageviews

01 09 10 11 12
Blogging tips